

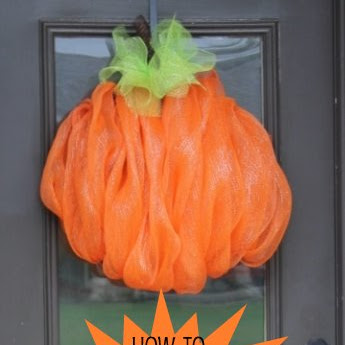
When I recently traveled to a nearby town to purchase deco mesh
from a store with a better selection than I could find locally,
I took the opportunity to look at wreaths that they had made
up. A really cute one was the pumpkin wreath.

Well, it's not a round wreath but more like door decor made on
a wreath form. The store had it made up on an official "work
wreath" but sometimes they are hard to find. Here's how I made
one using the same technique as the store's wreath but with
readily available supplies from a craft store.
The pumpkin decor above was made on a 20" wire wreath form.
Other supplies purchased were a 21" X 30' roll of orange
deco mesh, orange chenille stems, and orange craft paint.
The two smaller rolls are optional...I'll explain later.
wreath form $4, deco mesh $10, chenille stems $1, paint $2...all these from Hobby Lobby

Because deco mesh has an open weave that you can see through,
I suggest painting the wreath form orange so that it won't be as
noticeable in the finished door decor.

After the paint dries, add the chenille stems to the wreath form.
This is the "pattern" that you will need:

7 twisted stems on the top and 7 on the bottom
Twist the stems at least a couple of times tightly
onto the outside wire of the form.

The outermost top side stems were 12" apart from the bottom side stems.

Then fill in along the top and bottom with more twisted stems
and glue them into place. Originally I used a craft glue but got
tired of waiting for it to dry and added hot glue too. Be sure
before you glue that the "open arms" of the twisted stems
are on the rounded (the "good" side) of the wreath form.

(The above photo is showing the back side of the wreath form...I was lazy and did not paint the back.)
After the glue has dried sufficiently enough to keep
the stems in place, you can start adding the deco mesh.
the stems in place, you can start adding the deco mesh.
Leave at least 12" of deco mesh as a "tail" before your first gather.
It will be tucked into the wreath later.
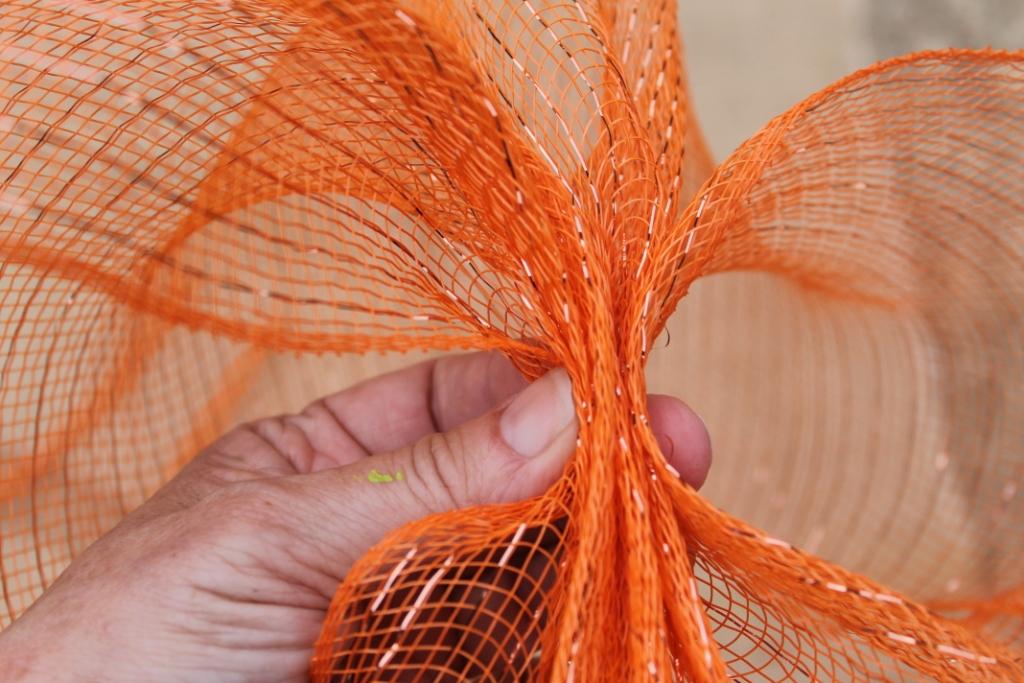
Gathering or pleating the deco mesh is important to give it a "poof".
I found it easier just to do tiny accordian pleats and keep them pinched
until securing the pleat point into the arms of the stems.
Your first pleat will be twisted into the first top side stem's
waiting arms. Twist tightly a couple of times.

Move down the deco mesh and make another pleat a little more
than 12" away. You want this to produce a nice but not too high
of a poof when you attach it to the twisted stem below first
point of attachement. This will be the side of your pumpkin.

From that point, you are going to take the mesh towards the top
of the wreath. Your third point of attachment is the twisted stem beside the first point of attachment. Gather/pleat the deco mesh at a point that produces a little more of a poof than your first poof.

You are going to want higher poofs as you go toward the
center to make the shape of a pumpkin.
After the center, you will decrease the height of the poof.
Do not cut the deco mesh at any point along the way.
Instead of going around the sides of the wreath, you are going to
go across the center of the wreath in an up and down pattern.
Always gather/pleat the mesh before twisting it tightly onto the
wreath form with the glued down chenille stems.


The center poof should be the biggest/highest one.

Don't skip any attachment points as you are
going top to bottom with the mesh.
You need all of them to make the pumpkin full enough.

After you have attached the pleated mesh in the last chenille arms,
you can cut the mesh leaving about another 12" tail.
You can just push the tail at the beginning and the tail
at the end into the backside of the poofs.
I only had a few feet left on the roll at the end and decided to
pull a few of the waving chenille arms to the backside of the
wreath and attach the rest of the roll on the back to make it a little more visually full. You would not have to do this step.


Again, just tuck the ends into the backside of the poofs.

To hide the arms of the chenille stems you can either wrap them
along the wires of the wreath form (this adds stability)...

...or just push them towards the center of the wreath out of sight.

To add deco mesh leaves to your pumpkin, make the beginnings
of a bow with 4" green deco mesh ribbon....

...and at the pinch point, secure it with an orange
chenille stem. Then cut the loops vertically.

Cut the ends of the mesh into a pointed oval like a leaf.
Attach the "leaves" near the top of the wire form with
the chenille stem.

To make a deco mesh stem, roll about 16" of brown mesh ribbon
into a spiral/roll. The picture of making the stem looked naughty.
I didn't want it taken "out of context" so it is not here.
Wrap a chenille stem around one end of the "stem" and attach
it to the wire wreath form at a point amongst the leaves.

If you don't want to buy rolls of deco mesh ribbon just for the
leaves and stem, here is an alternative I came up with with
things I had on hand. You might be more creative.

I painted some fake leaves a happier green color. For the stem
I hot glued at toilet paper roll in half and painted it brown-ish.

Chenille stems were added to the leaves and stem with hot glue.
Then they were wired onto the top of the wreath form.


I had to do a little pulling, pushing, tucking to the orange poofs to make them a better pumpkin shape...you might need to also.


My My...this is one CUTE pumpkin. Thanks for sharing how you made it.
ReplyDeleteBlessings,
Linda
What a great tutorial! This is really adorable and easy to do. Love the way it turned out! So creative!
ReplyDeleteThat is REALLY, REALLY cute. A great tutorial, too. I think I could do this after seeing how you did it. Really sweet- thanks- xo Diana
ReplyDeleteGreat idea and tutorial! It looks beautiful on your door!!
ReplyDeleteSo fun, this is amazing. Thanks for the tutorial. Hugs, Marty
ReplyDeleteI love it, thanks for the tutorial. I would love to make one :)
ReplyDeleteDebbie
What a fun project! Great tutorial. Thanks for stopping by with your lovely comment. New Follower.
ReplyDeleteJody
Adore the pumpkin door decor! Great tutorial! Thank you for linking this terrific project to Potpourri Friday at 2805!
ReplyDeleteawesome!! I really love it. Such a fun and whimsical fall idea. :)
ReplyDeleteYour pumpkin turned out great! Cute idea and you put together a great tutorial:@)
ReplyDeleteI love this project! I'd love it if you'd join me on my T.G.I.F. Linky Party that I host every Thursday evening - Sunday and I'd love to be added to your list. :)
ReplyDeletehttp://www.craftjunkietoo.com/2012/09/tgif-linky-party-65.html
Hugs,
Tracy
Stopping over from the Pinterest party to pin 'ya to my wreath board.
ReplyDelete~Bliss~
Thanks for sharing over at Craft Junkie Too :) I have this FABULOUS project featured on my facebook fan page this week-end so I hope you can check that out. :)
ReplyDeleteI also invite you to grab the featured me button of of my blog.
FACEBOOK
http://www.facebook.com/pages/Craft-Junkie-Too/162946417058976
BLOG:
http://www.craftjunkietoo.com/
What a cute pumpkin and a great tutorial!
ReplyDeleteLOVE this wreath. So cute! Thanks for stopping by for our Pretty Things Party. Hope to see you again next week!
ReplyDeleteSo cute! I just love that mesh...
ReplyDeleteThank you for your nice comments on the magazine feature!
Kristen
That is one ever so cute pumpkin wreath!!!
ReplyDeleteLoving this so much I decided to feature it today! :)
ReplyDeleteJen
I love this and I have one of these wire forms, so I think I could totally make this! (Despite that I'm not terribly crafty.)
ReplyDeleteAnd yes, I'm doing my 31 days at Nester...but while it has a little bit of house, it's mostly just silly. Like me.
What a great wreath and a great tutorial. Thank you for all the tips and tricks--so nice of you! Happy Fall!
ReplyDeleteSuch a pretty wreath, and I love the intensity of the colours! Great tutorial.
ReplyDeleteYour pumpkin wreath is so adorable. My neighbor makes the cutest door hangers with that mesh stuff. I am going to email her a link to this post. She would love to see it, and maybe I can get her to make me one ;P
ReplyDeleteGreat idea! I love mesh. So going to copy you.
ReplyDeleteThis is adorable! Very creative! Would love if you'd join our Countdown to Fall link party! Hope to see you there! Have a great week! :)
ReplyDeletehttp://dixie-n-dottie.blogspot.com/2012_09_17_archive.html
This is so adorable and creative!
ReplyDeleteYour step-by-step photos and instructions are wonderful. That is one of the cutest Fall door ornaments I've seen in a long time. Great job!
ReplyDeleteHi girl -- me again...
ReplyDeleteFeaturing this fabulous wreath as part of my pumpkin Pick of the Patch features today. I hope you can stop by and check it out as well as consider grabbing the button code for your blog or blog post. Thanks again for sharing this over at my T.G.I.F. Link Party a few weeks ago. :)
xo,
Tracy
http://www.craftjunkietoo.com/2012/09/pick-of-patch-heres-30-pumpkin-ideas-to.html
Your mesh pumpkin is so cute and cheerful! Hope you'll come share it with us at Gettin' Krafty With It!
ReplyDeletehttp://kraftykat76.blogspot.com/2012/09/gettin-krafty-with-it_24.html
What an adorable little piece of decor! Thanks for sharing all of the steps - I just may try this one out this weekend! :)
ReplyDeleteCute pumpkin- great tutorial. We did one just like this last year!
ReplyDeleteGirl this is the cutest ever! What a clever idea, very unique. Turned out adorable. Thanks for sharing the tut too.
ReplyDeleteLove it! And I'm gonna copy ya. :)
ReplyDeleteThank you SO much for this tutorial! Here is my pumpkin: My pumpkin picture
ReplyDeleteAdorable! Thanks for sharing how to make this.
ReplyDeleteAdorable! Thanks for sharing how to make this.
ReplyDeleteThanks! That's so cute =)
ReplyDeleteThank you for posting how to make this pumpkin wreath! I just finished mine and love it.
ReplyDeleteI can make this with this wonderful tutorial, the best one I have seen.
ReplyDeletethis is so cute. I pinned it to my pinterest as I will make it later. love your site. you have some very cute ideas. thanks for sharing them
ReplyDeleteI gonna do this if I miss to buy pumpkins. Really nice and easy to follow.
ReplyDeleteThank you so much for your step-by-step, so-easy-to-understand directions! You made is so simple! Thank you for sharing!! Now I have to see how I can make one looking as good as yours!! :)
ReplyDeleteThank you so much for sharing. I am going to try your version. You make it seem easy. I love all your ideas.
ReplyDeleteI made my circular wire wreath into an oval shape for just a little different shape to my pumpkin.
ReplyDeleteThank you showing this wreath, love it!
ReplyDeleteI love it you did a great job
ReplyDeleteYou have the best tutorials and designs! Thank you for your guidance!
ReplyDeleteI am so happy I found your tutorial. You give awesome easy instructions and just make me want to make all of them. Thank you so much even if I am 5 yrs late. haha
ReplyDeleteThank you for this cute idea for the fall. Instructions and pictures made it easy to follow.
ReplyDeleteThank you so much for this! I couldn't believe how simple is was to DIY! It will be featured in our future article!
ReplyDeleteVery informative tutorial. Thank you for excluding the x-rated pictures of the stem, I would have blushed and clutched my pearls!! (haha)
ReplyDeleteThis is just what I was looking for to put on the front of my home. Thanks for sharing the pattern.
ReplyDelete