

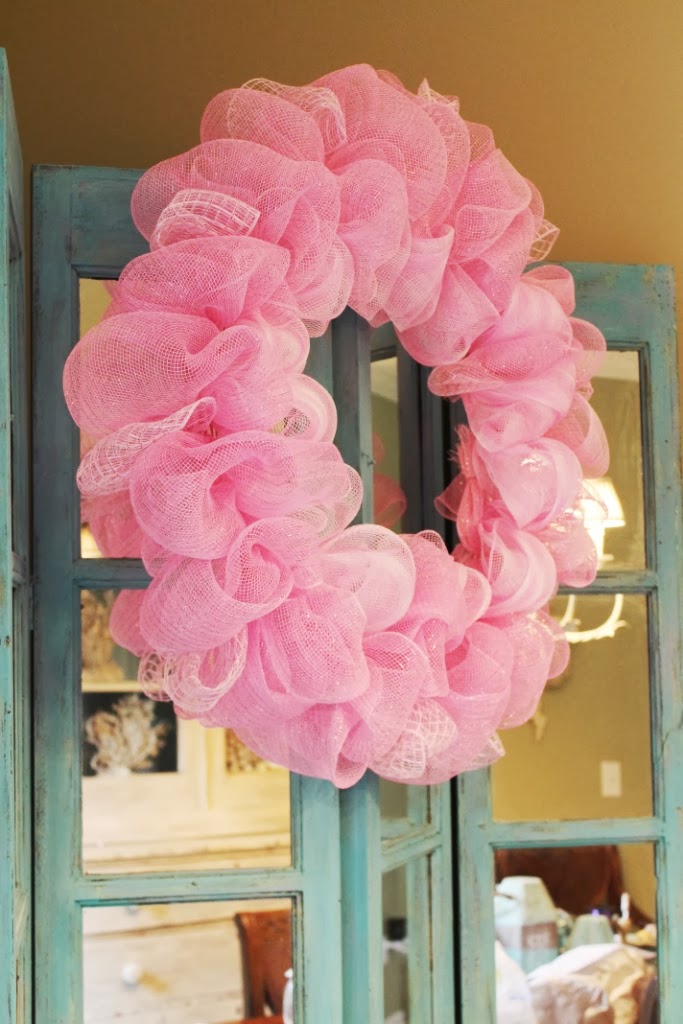
Recently, I saw a deco mesh wreath that had the mesh
attached in such a fun and fluffy way that I inspected it to see
how it was done. Although I couldn't find a tutorial on the
internet of how to make this wreath, I decided to give it a try.
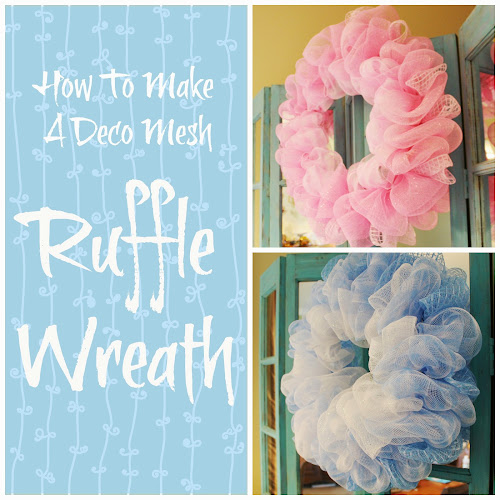
I don't know what it's official name for this type wreath is
but for now I am calling it a "Ruffle Wreath"
because the high mesh loops remind me of fluffy ruffles.
The original wreath used a standard wire wreath form.
For the pink wreath an 18" form was used and for the
blue wreath a 16" form was used.

It may not be necessary but I like to paint the wreath forms for
deco mesh wreaths in the main color of the mesh so it won't
be as obvious through the open weave of the mesh.

It doesn't have to be a perfect paint job...just enough to
break up the visual lines of the dark green wires.

In the past, I have used pipe cleaners (also known as
chenille stems) to attach the deco mesh to wreath forms but
the wreath I was attempting to copy had zip (or cable) ties
attaching the mesh to the form. I wasn't sure if that was a
necessary element in making the wreath or not but I was
afraid not to use them. They are available in the electrical
department of home improvement or hardware stores.

The wreath I wanted to copy used clear cable ties but I
thought those were too expensive so I went the cheap-o
route and got this pack of 200 assorted sizes for less than $5. Sometimes Dollar Tree has zip ties in their hardware aisle.
thought those were too expensive so I went the cheap-o
route and got this pack of 200 assorted sizes for less than $5. Sometimes Dollar Tree has zip ties in their hardware aisle.

I've never used cable ties before so I looked on the
internet to find out how. Here it is in a nutshell:
internet to find out how. Here it is in a nutshell:

The color of the cable ties leaves a lot to be desired so they
got the same paint treatment as the wreath forms.
Really, only a small portion of the cable tie needs to be
painted if the color bothers you too...on the smooth side
and near the head of the cable tie...that is all that might show.

I did three at a time...it goes quickly...doesn't need perfection.
To start attaching the mesh to the wreath form gather/pinch
the mesh width-wise about 8" from the beginning of the roll.
This leaves a "tail" that you will eventually pull to the back
of the wreath form and attach.

This first round of mesh on the wreath is the 21" wide size.

Keeping the mesh pinched, place it on one of the wires.
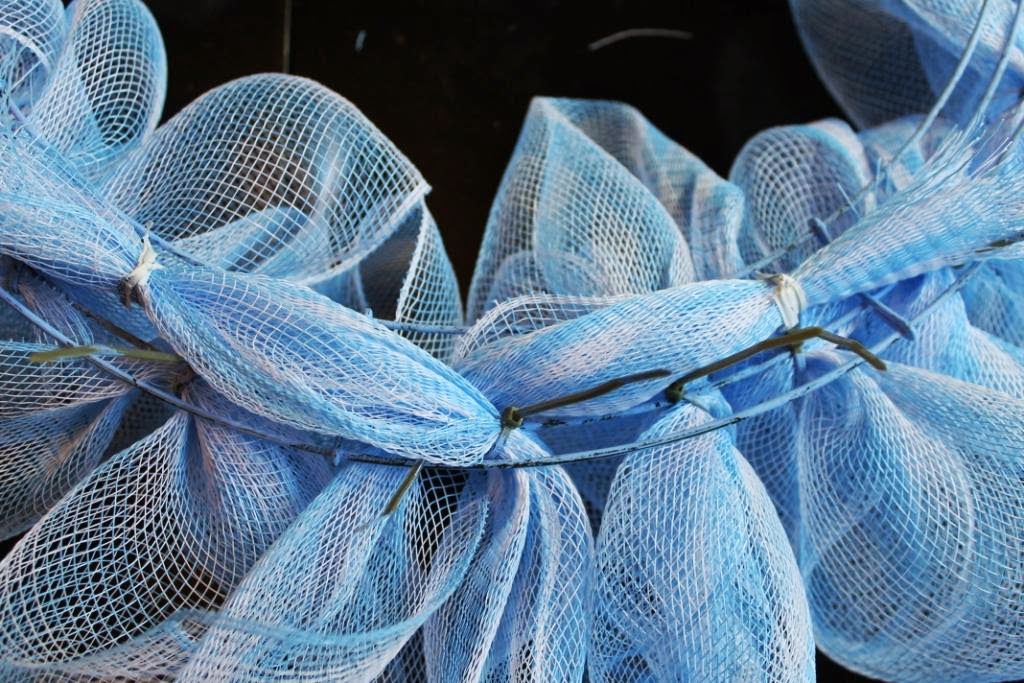
Attach the pinched mesh to the wire with the cable tie.
The head of the cable tie should be on the backside of the
wire wreath form. Bring the tail of the cable tie around the
wire, on top of the pinched mesh, then again to the back.
Be sure the smooth side of the tie is on the outside of the
loop and the ribbed side of the tie is on the inside.
Push the tail through the head of the cable tie and pull
it until it holds the gather snugly on the wire.
To keep the size of the poufs uniform, I found it
reassuring to measure the mesh for this type wreath.
For this larger wreath, the gathering/pinching spots
along the mesh were 10" apart.

I'm not sure the original wreath kept each color on a
certain wire on the wreath form, but for this one I did...
well, I meant to...I made a couple of boo-boos.
This first color of mesh was (mostly) on the third wire
from the center. Place your second gather of mesh about
two to three inches from the first attachment point and secure
it with a cable tie. Again the head and tail of the tie
will be on the backside of the wreath for aesthetics.

You might want to not tighten the cable ties as much as
they will go until you see all your poufs to determine if they
need to slide a little bit one way or another along the wire.

Here is the backside of the wreath after the first color of mesh:

Pull the beginning and ending tails to the back and
secure them also.
Here is the front of the wreath with one color:

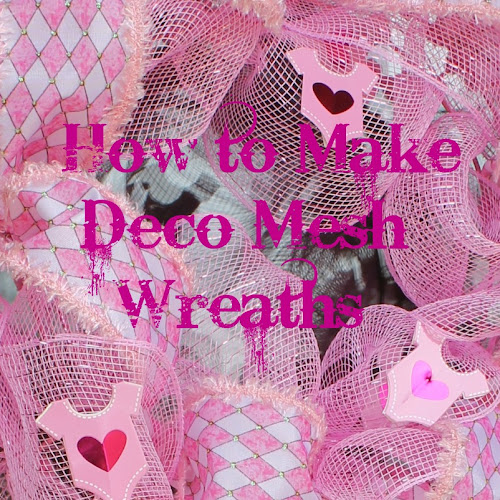
The second color of mesh on this wreath is a pink and
white check. It was gathered and attached on the second
wire from the center of the wreath form. It is also a 20"
wide deco mesh. The different colors were started and
stopped at different spots along the wreath form so the
"tails" would not make one spot too bulky on the back.

Here is the front after the second color mesh:

Really, it is very full with these two colors and you could
very well stop here but I had some pink "window pane"
mesh that I also wanted to add too.

The 6" mesh was a better color match so I went with that.
The length of mesh is shorter on the smaller width mesh roll
so I only put half as many poufs of it so I would have
enough to go all around the wreath. It was attached to the
outside wire on the wreath form with the cable ties.

In the end less then half of the solid pink roll was left, more
than half of the pink and white check was left and even some
of the 6" roll was left.

After the three meshes were attached the poufs were
fluffed and pulled in towards each other to integrate the colors.
When I was pretty happy with the way it looked, all
the cable ties were pulled as tightly as they would go to
secure the poufs/ruffles in place along the wires.
The tails of the cable ties can be trimmed down on the back.

This wreath turned out to be about 22" wide...

...and a fluffy, ruffly 10" deep.

You could certainly add more embellishments to
personalize it for a certain person or color scheme.

If you would like a smaller version of the ruffle wreath,
the basic techniques are the same, just use a smaller wreath form.

All of these deco mesh rolls came from Hobby Lobby.
They are the 21" wide version. The regular meshes are 30 feet
long and are $9.99 (but can be bought with a coupon or when
on sale). The window pane meshes are $13.99 per roll.
Actually, I thought I had a roll of solid blue regular mesh
to use for this baby boy's wreath so it turned out a little
lighter than I had intended. The blue and white check mesh
was attached with cable ties to the third wire from the center.

The length between gathers along this mesh was about 8".
The spacing between attachment points was 2-3" along the
wire. Here is the first color halfway through:

I learned that it took about 60 cable ties to do a wreath going
around three times (I used three colors but you don't have to).
Here is the back of the wreath after the first color:

The tails of this first color got tied down with twisty ties
'cause I didn't want to run out of cable ties for the poufs.
White mesh got added to the innermost wire of this wreath.

The white poufs were still 8" long and 2-3" apart along the wire.
Here is the wreath after the white mesh application:

The different color mesh poufs in the above picture have been
more or less integrated with each other by pulling the poufs
towards each other and almost alternating the colors around
the wreath. You could pull the poufs back from the center
more if you like a more open center.
Then the blue window pane mesh was added along the
outermost wire of the wreath form with cable ties.

The window pane poufs were also integrated in with the
other meshes by pulling them in between the other colors.
When you are happy with the look of the wreath, pull
all the cable ties tightly and trim off their tails on the back.

This wreath is about 20" across and about 10" deep.

Although I didn't measure what was left on the mesh rolls
when the wreaths were finished, I would say for
this size wreath, allow about a half a roll
(15 feet) per each time around the wreath form.

Other embellishments were added to this wreath to go
to a baby shower. The mom may also use it on her
hospital door when the baby actually arrives.
The cable ties on the two wreaths above held really well
and did not slide along the wire after they were pulled tight.
I was curious, however, to see if the same ruffle effect
could be achieved by using pipe cleaners to hold the poufs
in place instead of cable ties.
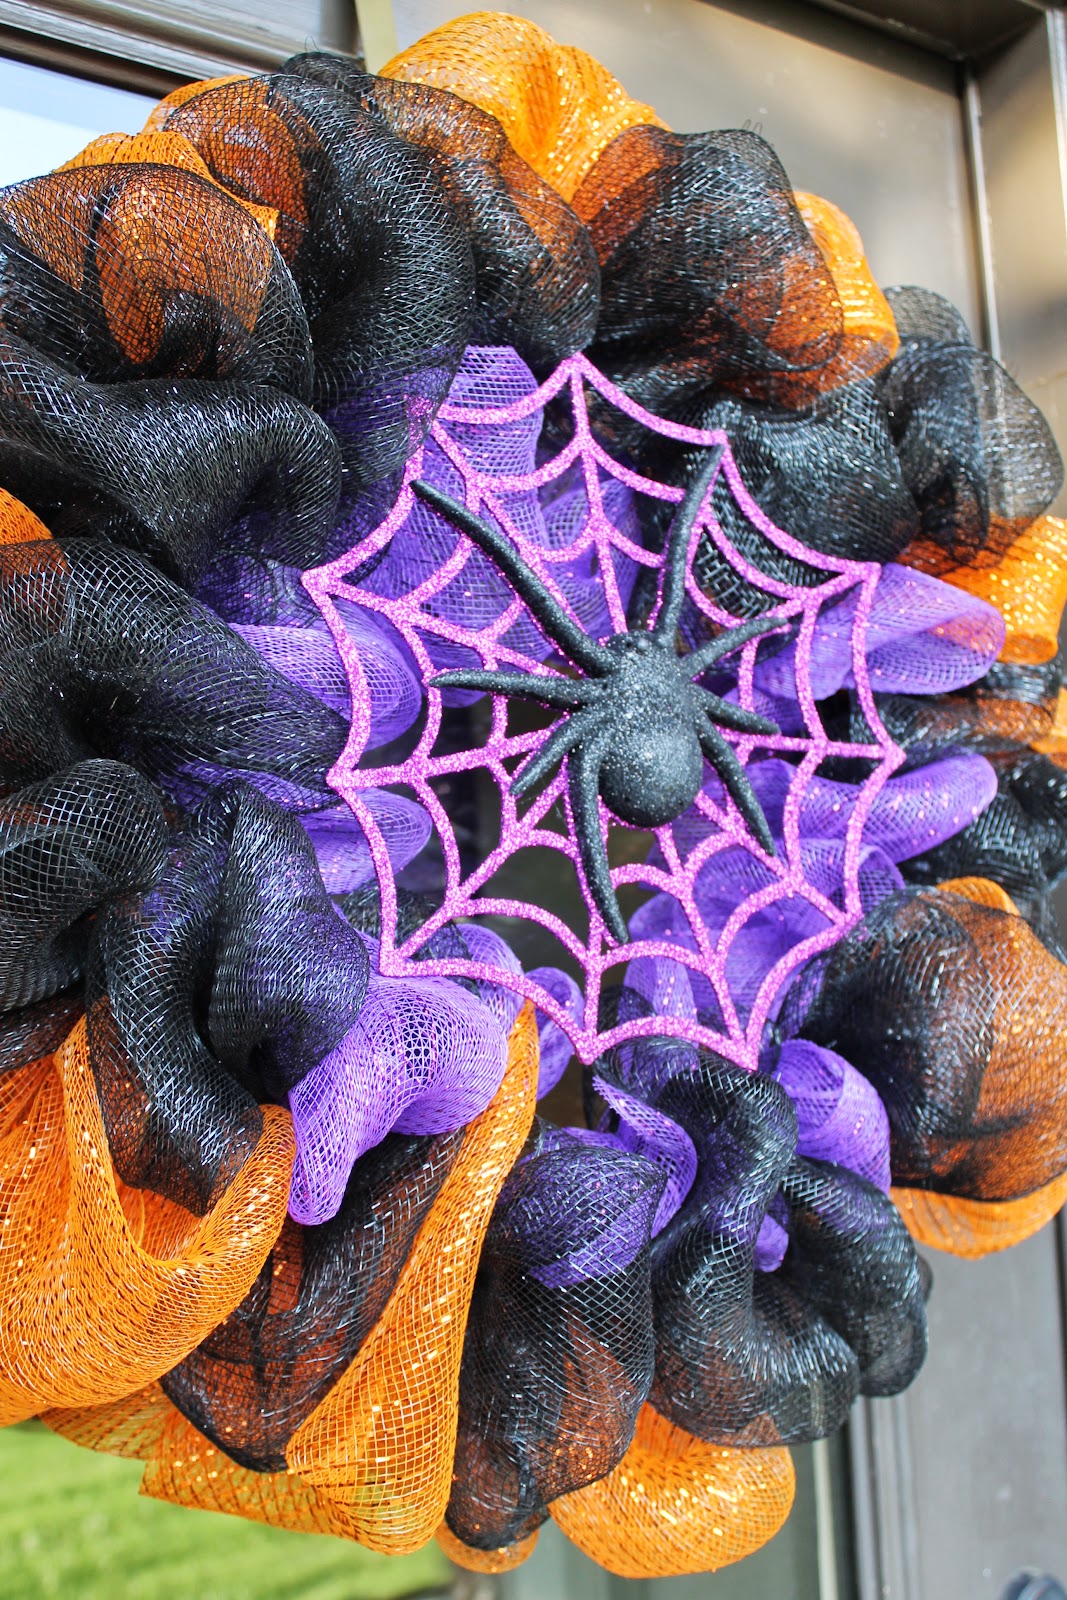
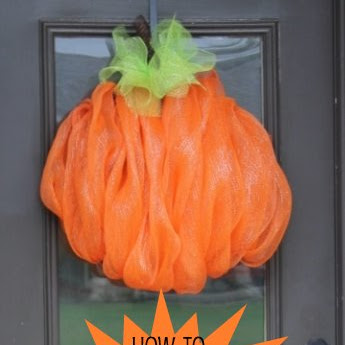
Last year I never got around to making a Halloween wreath
so I decided to do the experiment with totally different colors
than the baby wreaths and get a head start on Fall decorating.

A 16" wire wreath form was painted black on the front
then 20" wide black deco mesh poufs were added to
the third wire with black pipe cleaners cut into thirds.

Even twisted tightly, the pipe cleaners allow the mesh to
slide along the wire if they are not secured. One way to make
the pipe cleaners stay in place is to glue them onto the wire.

Another way is to use the left over "legs" of the pipe cleaners
and twist them along the wire. Gluing is better if you have the time.

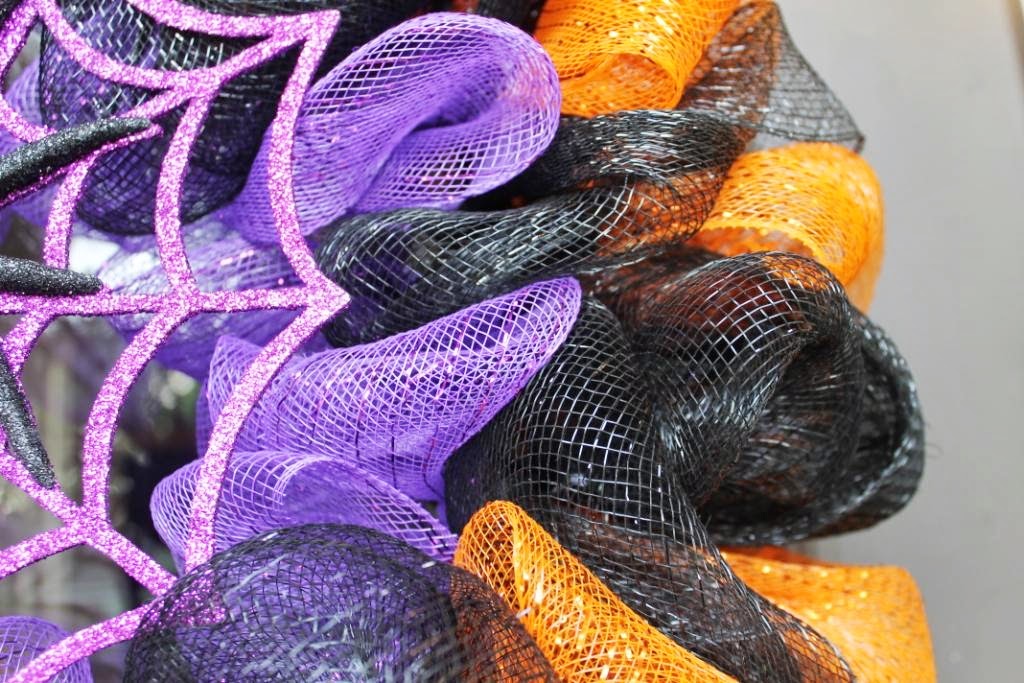
After the black, orange mesh was added to the outermost wire.

The orange mesh poufs (8" long, 2-3" apart on wire) were
attached with pipe cleaners that had been cut into thirds.

Here is the wreath after the orange mesh had been added:

Michael's has started carrying a small supply of deco mesh
in the ribbon department. The purple mesh came from there.
It was added on the innermost wire of the wreath form
with purple pipe cleaners. Since you can see the different colors
of mesh more in this wreath, I wanted to show what the ruffle
wreath would look like if you wanted to keep the poufs more
separate and not pull them together and integrate them.

Here is the wreath with the colors pulled together:

To give the wreath a quick finish for now, this glittery spider
on a web was added to the wreath.


So, yes, you can use pipe cleaners to attach the deco
mesh poufs to the wire wreath form instead of cable
ties to achieve the ruffle wreath look.
Either way, when you make one of these wreaths for
yourself, you may have folks stopping to inspect it to
try to determine "how DID she get that look?" just
like I did.


All of your deco mesh wreaths are so pretty! I think you've become an expert in using deco mesh. I like the fluffiness of these much better. I think we'll see more and more different ways of using deco mesh. They keep coming out with new colors and patterns. I also noticed Hobby Lobby started carrying wreath forms with the ties connected. Love your Halloween wreath! You have so many fantastic ideas of making your mesh wreaths look beautiful!
ReplyDeleteOh I am so happy to see this and the post before this. I havn't worked with the deco mesh yet and didn't have a clue. Great tutorials, thanks tons. Be sure to link these up to Inspire Me this afternoon, I am sure there are a lot of other people that don't know how to do these either. Hugs, Marty
ReplyDeleteOh my goodness, you are so talented! I love both pretty wreaths and your tutorial is fabulous, you make it look so easy....I wander? Thank you for this and for your kind and sweet visit and specially for the generous comment about my daughter. I am lucky cause I have two gorgeous girls, the other is a blond, and a hard worker lighting designer and has two g'girls for me, lol..
ReplyDeleteHave a wonderful September.
FABBY
I love this wreath idea! Especially the Halloween one.
ReplyDeleteWow! Really nice, I love how you go into so much detail to show how it is made. If you are interested in more DIY projects I would like to invite you to my webpage at www.diynow.weebly.com
ReplyDeleteExcellent tutorial! I have been seeing the wire mesh at Hobby Lobby, but did not have a clue as to how to use it. Now, I know. The purple in the Halloween wreath rally makes it...so much more interesting than just black and orange.
ReplyDeleteVisiting from Stone Gable's linky party...
Judith
Gayle, I have seen you make so many fabulous décor mesh wreaths that now I HAVE to make one. I have mesh purchased on sale after xmas last year to experiment with. Thanks for sharing the tutorial at the Open House party.
ReplyDeleteHugs,
Sherry
These are beautiful! I need to make one! I found you through Make the Scene Monday! If you like to link up come over to Craft Frenzy Friday at www.craftdictator.com!
ReplyDeleteI seen one of these wreths at Hobby Lobby and wondered how they did it, Thank you so much for the great tutorial :)
ReplyDeleteWonderful tutorial! Love these mesh wreaths... I've pinned this project for easy reference.
ReplyDeleteI linked over from the Make the Scene Monday Link Party where I am participating too with Quilled School Bus and Keep Calm Free Printable and would love it if you'd stop by.
Hugs, Antonella :-)
I am so glad that I stopped by today to thank you for dropping by my Blog!!
ReplyDeleteI have make wreaths using the deco mesh but I used the grapevine wreaths. I will definitely have to try this as I LOVE how your wreaths look!! Stunning!!
Thanks so much for sharing this with us!!
Hugs,
Deb
Thanks so much for linking up to the Dream*Create*Inspire party! I'm so glad you did--because I have deco mesh but have been too afraid to test it out. Your tutorial is perfect! Love it! Thanks Gayle!
ReplyDeleteGail! I love how you do these wreaths. Great job! Thanks for sharing at the Dream*Create*Inspire Party! :)
ReplyDeleteyou make it seem so easy...love all the fun colors!
ReplyDeleteI've been scrolling thru all your fabulous deco mesh wreaths. They all look wonderful and you make it look so easy that I might have to give this a try.
ReplyDeleteI thought I had followed you months ago but I guess that I was wrong, so glad to have run across your blog again today. Oh, btw...now I'm following you. Stop by for a visit sometime.
Just found your blog for the first time and love, love it! Also love the name you chose. You do an excellent job of explaining and providing detailed pictures. Can't wait to try my first mesh wreath!!
ReplyDeleteElaine
SO glad I found your blog! You have so many wonderfully creative ideas!! I am your newest follower =)
ReplyDeleteWhat a fantastic tutorial! I love the Halloween spider wreath. Gonna pin this to my holiday craft board for reference.
ReplyDeleteReally a worth reading tutorial. Last time I visited your blog and it was good but this time it is mind blowing. Going really good. Keep it up!
ReplyDeleteIF you need some extra information on Wire Meshes , I've found a site on Internet for you.
www.bcwiremesh.com
Thank you for having this tutorial on making a Mesh Wreath. I knew what I wanted with my wreath, all the products. However, I did not know how to get started. Your tutorial was very easy! Thank you!! I am making a Spring Wreath for our front door!
ReplyDeleteThank you so much for posting this.. I was trying different things on my deco mesh wreaths and I tried this tonnight on a babygirl wreath for a baby shower next week and it turned out absolutely amazing. I love this idea. Great work :)
ReplyDeleteThank you for taking the time to teach us how to be "copy cats!!" I have admired these types of wreaths for quite some time and now have the nerve to try it (watch out Hobby Lobby, here I come...again). May you have a happy and blessed day!
ReplyDeleteI LOVE you`re blog you have awesome diy`s and you`re great at them
ReplyDeleteYour directions are the best I have found. Thanks for taking the time to explain. They are beautiful.
ReplyDeleteTHANK YOU for helping me understand more about decorating my wreath. I have gotten a ton of ideas and how do tricks and tips on how to decorate the wreaths . I truly appreciate you being my copycat. I look forward to more of you wreath and tutorial
ReplyDeleteCheryl
The various applications and uses for wire cloth or Wire mesh products are literally endless, and span
ReplyDeleteacross all areas of commerce and industry. Aside from being a product itself, wire cloth is also used to
strengthen, reinforce, or improve many other products in a variety of ways. Wire mesh railing is one of them which is a multi purpose product.
You are awesome!
ReplyDeleteThank you for making wreath so easy to understand because I was having difficulty understanding some of the other tutorials that I've been reading up on. Love the pictures and the way you described everything, also liked the wire ties idea. Again thanks for the info..P
ReplyDeleteIdid not know you could use these tie , dose the mesh material hind all the mechanic's
ReplyDeleteI knew I wanted a spring/Easter deco mesh wreath but the YouTube tutorials were not as clear and as easy to follow as yours. I salvaged 2 wire wreath forms from evergreen Christmas wreaths. For outdoor use I apply a spray primer on the wire which got a little rusty in the snow of our Midwest winter. Thanks for your easy-to-follow tutorial. I appreciate the written instructions so I don't have to listen to an 8 minute video just for s list of materials.
ReplyDeleteYour diretions are fabulous! I was able to figure out how to make my own deco mesh wreaths using your instructions!
ReplyDeleteThank you for taking the time to document such detailed and easy to follow instructions allowing just about anyone to create such beauty. You have true talent beyond the magnificent wreaths. I would guess you to be a teacher, trainer or educator of some sort.
ReplyDeletesincerely
This is the first time I've seen the mesh attached with zip ties. What an excellent idea. I live in Ft Myers, FL and with all the humidity I've been worried about how the pipe cleaner ties would stand up to the weather from season to season. When I pull out last year's Christmas decorations I know I'll have more ruined from rust. I think I'm following your zip tie idea and that will save my wreaths until the frames rust thru. Also thinking about spraying the frame with a clear sealer before I start. Thank you!
ReplyDeleteThanks, suppose interesting. .
ReplyDeleteHave made a couple but this is the best instructions yet. I am sure I will love this one!
ReplyDeletemerci pour les explications très bien détaillées, je vais essayer de faire aussi bien !
ReplyDeleteWreaths are beautiful. Just wondering why ur not using Dollar store or A.C.Moore?
ReplyDelete"Most" of their products are good and inexpensive. Just check Dollar 6"green (sometimes frays] But even wire wreath and pipe cleaners just $1. Good deal when making quantities..also good deals on embellishments
Your craft project is great! Your instructions were clear and concise! The pictures with your instructions were accurate that I was able to follow along! Thank you! This is what I needed! Stay crafting my friend!
ReplyDelete