

'
Sometimes you might want something other than a wreath on
your door at Christmas time. A painted burlap shape is an easy
and inexpensive option that you can design to be whatever
you want it to be. I had seen some images of whimsical
Christmas trees that I thought would be fun to try to copy.
The window area of my front door is long and thin. I wanted
the tree to fill up as large a portion of that as possible to be
easily visible from the street. The good thing about painted
burlap door hangings is that you make the pattern to cut the
burlap so it can be the size and shape that you want.


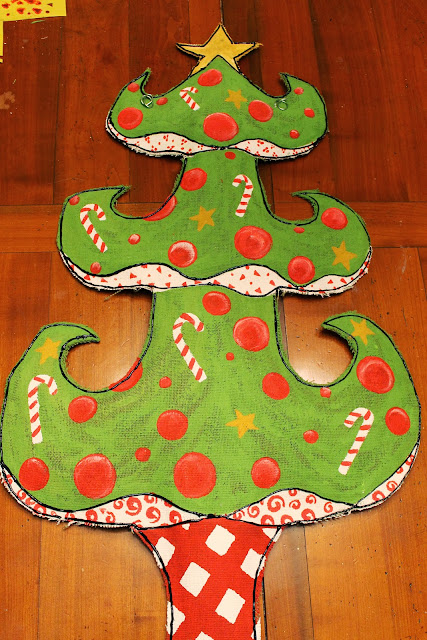
To avoid having too many just plain areas of color on this
large burlap hanging, added some embellishments like
making the tree stand have diamond shapes...

...adding painted candy canes on the tree...

...stenciling the white areas...

...and using a trick I saw on Pinterest...cardboard tubes
to make painted circles. At first I used a smaller diameter
tube from a wrapping paper roll. Dip the end in paint...

...then onto your surface...

...to make ball ornaments shapes to color in.

After making several small ball ornaments on the tree, I
tried a few larger ornament shapes made with an
empty toilet paper roll to add variety.


Depending on how much time and patience you have, you
could decorate each ball ornament but I just used that
old paint trick of loading different paints on either side
of the paintbrush and applying it on a circle shape in
a swooping motion to give some dimension to the balls.

All of this paint can make the front and back stick together.
Use a paint brush or ruler to try to break up any stuck
together places before stuffing. This is the first time I have
had the burlap stick together. The other projects I have
made used a looser (cheaper) weave of burlap so probably
the tighter the weave, the more likely it is to stick.

With the tighter weave burlap, however, it is
easier to paint more intricate images on it.
When your paint is dry, you can stuff the burlap shape.
If your hanging is going outside, be sure to stuff your shape
with a material that will not mind getting a little moist.
One option that is free is plastic bags from stores.

To keep the edges of your shape from fraying as much
as possible, use a ruler or the end of a paint brush to
poke the bags into the openings that you left while you
were gluing (or sewing) the two shapes together.
If a whole bag is making a bigger lump than you want,
you can cut the bags in half (or more).
Trim off any frayed edges that bother you.
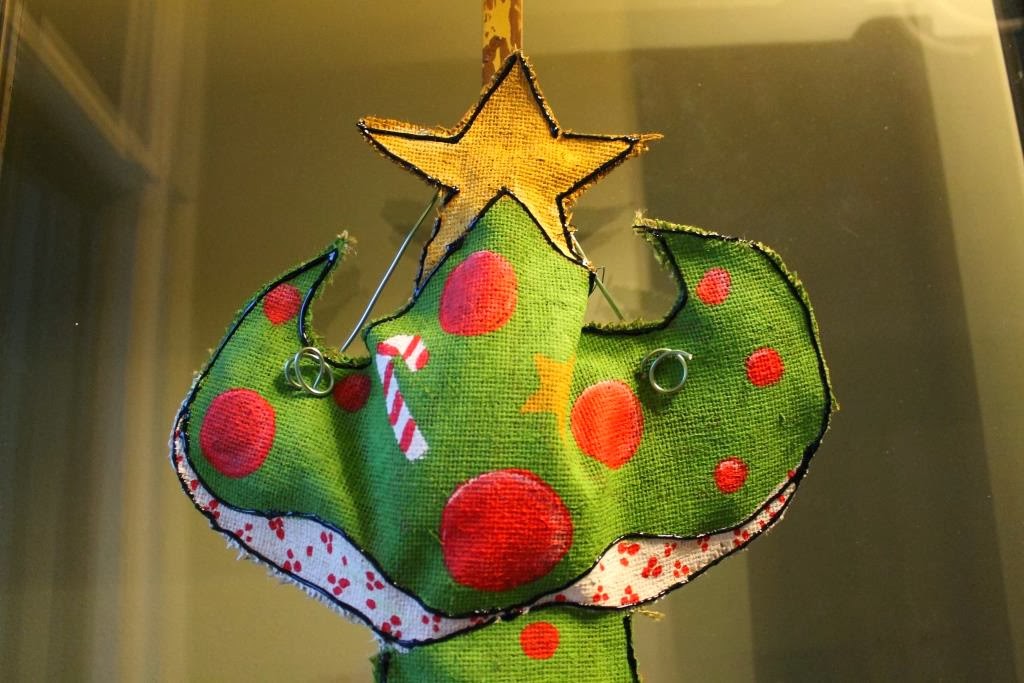
To hang most burlap painted shapes, you use wire.
This aluminum wire (available at Dollar Tree and in
the floral sections of craft stores) is easy to cut and
bend but it is also pretty sturdy.

Just poke it through the burlap, make
a curly-q, then (leaving enough length to go over your
wreath hanger) poke it again on the other side.

With this shape burlap hanging, after about a week (and lots
of rainy weather), the tree looked like this:

Maybe there was not enough space between the wire
insertion points to support the length of the tree?
The wires were pulled out and a grosgrain ribbon loop was
glued onto the center of the back of the tree up high.
So far, so good...hanging without buckling now.
 You can paint the back of your burlap door hanging too. It adds even more stiffness.
Although I wanted to add one more thing to the tree,
I needed it "as was" to take pictures for another blog
post showing the other outside decorations for this year.
"Make Big Candy For Decorating"

It looked perfectly fine BUT if you want to add a finishing
touch to your painted burlap hanging, you can outline the
edges (or more if you want) with fabric paint.

Painted burlap door hangings seem to hold up fine in a
covered area outside. They would probably not hold up
in an outside area that gets rain, snow, etc. directly on them.
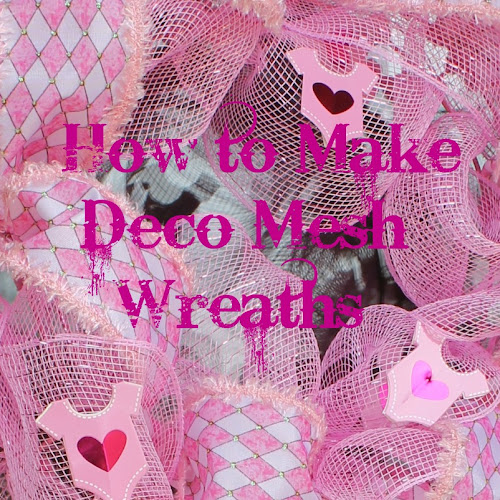
One of the main reasons that I wanted this burlap hanging
on my door this year is that I made wreaths for the six
windows that are on the front of the house and I thought
something other than a wreath would give some variety.


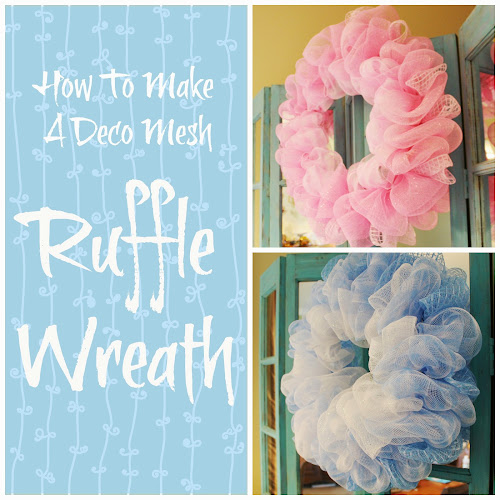
 If you would like to see how these deco mesh wreaths were made, click
"Make a Christmas Mesh Wreath"


The painted burlap Christmas tree along with the other
decorations that were made new this year combined to
win this award!

If you want a painted burlap Christmas tree for next year
"pin" it on your boards...I'm really late in posting this tute!
I'm sharing this post at
Sunday Showcase @ Under the Table and Dreaming
Metamorphosis Monday @ Between Naps On The Porch
Inspire Me Tuesday @ A Stroll Thru Life
Nifty Thrifty Tuesday @ Coastal Charm
The window area of my front door is long and thin. I wanted
the tree to fill up as large a portion of that as possible to be
easily visible from the street. The good thing about painted
burlap door hangings is that you make the pattern to cut the
burlap so it can be the size and shape that you want.

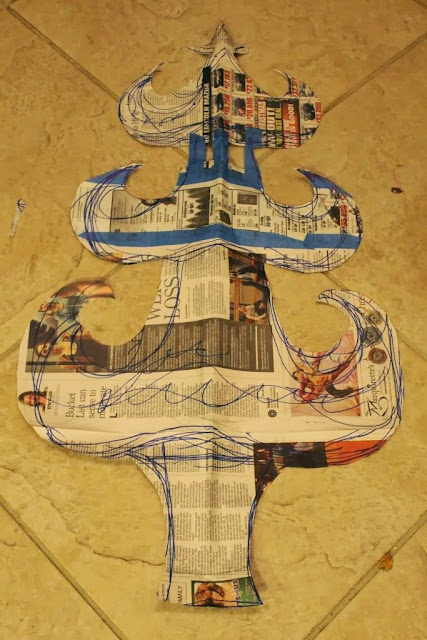
To make this pattern, I taped together newspapers to
be the same size as the window so I would know
how much space I actually had to work with and
make the tree as large as possible.
Freehand draw the shape that you want your burlap
hanging to be. My shape was a lot of trial and error
with a sharpie so I could see the lines on the newspaper.
If you have some white paper without writing to make
your pattern that would be even better.

Since I wanted both sides of the tree to be the same
shape, I folded the paper in half and will cut both
sides at the same time.
After I got the shape of the tree drawn, I thought
I needed some more height on the middle section
so I added a "spacer" with painter's tape.
As long as you can see the shape you want, your
pattern does not have to be pretty.

Although you don't have to stuff your burlap shape, it adds
dimension and strength to the door hanging. To be able to
stuff it, of course you need two identical shapes of burlap.

Pin your pattern to the burlap and cut it out.
I happened to have green burlap left over from some
curtains that I made a few years ago.
Since you are going to be painting the burlap, you can
use natural colored burlap also for your door hanging.
Since there are colored burlaps available, if you
buying burlap specifically for this project, it does
help to purchase a burlap close the the color your
door hanging will eventually be.
Since this burlap had been wadded up in the attic for
several years, it was wrinkled. Go on and get any major
wrinkles out of the burlap by ironing before painting.

Line up your two burlap shapes.
You can sew the shapes together if you want but hot glue
is a good option too. You will not be turning the shapes
inside out for this project. Your ragged edges can be
trimmed at the end of the project if they bother you.
Part of the charm of the burlap door hangings is that
they are not perfect and have a rustic quality to them.

If you are going to stuff your shape, leave openings between
the two shapes the get the stuffing in there.
If you are making a shape like a football, you probably only
need to leave one opening. Since this shape is tall and has
some more intricate points, I left several openings
between the two shapes to be able to stuff it easily.

If you are using hot glue to join your pieces, only put glue on
small sections at a time so that you can press the shapes
together before the glue dries. Be VERY careful pressing the
sides together because the hot glue WILL come through the
weave of the burlap and burn your fingers. You can use a
wooden skewer or the end of a paint brush instead to press.
Leave the openings on the least-curved parts of the shape.
You can stuff your shape after you get it glued together
as I started to do in the photo below. Then I stopped.
Wait. Do you stuff before painting or after?

The advantages of waiting to stuff the shape AFTER painting
it are that the shape is easier to paint flat and that the paint
seals the edges somewhat and keeps them from fraying as
much when it comes to the stuffing part.
The disadvantage of stuffing after painting is that your paint
sometimes seeps through to the other side of the burlap in
places and the front and back sides stick together.
Either way is fine. I chose to wait to stuff this time.
Protect your work surface.

Acrylic paints from the craft stores are fine for this project.
You can thin them with a little water to make them
easier to brush onto the burlap. The paint seems to be
the thing that makes the burlap stiff so try to water
the paint down as little as possible.

To avoid having too many just plain areas of color on this
large burlap hanging, added some embellishments like
making the tree stand have diamond shapes...

...adding painted candy canes on the tree...

...stenciling the white areas...

...and using a trick I saw on Pinterest...cardboard tubes
to make painted circles. At first I used a smaller diameter
tube from a wrapping paper roll. Dip the end in paint...

...then onto your surface...

...to make ball ornaments shapes to color in.

After making several small ball ornaments on the tree, I
tried a few larger ornament shapes made with an
empty toilet paper roll to add variety.


Depending on how much time and patience you have, you
could decorate each ball ornament but I just used that
old paint trick of loading different paints on either side
of the paintbrush and applying it on a circle shape in
a swooping motion to give some dimension to the balls.

All of this paint can make the front and back stick together.
Use a paint brush or ruler to try to break up any stuck
together places before stuffing. This is the first time I have
had the burlap stick together. The other projects I have
made used a looser (cheaper) weave of burlap so probably
the tighter the weave, the more likely it is to stick.

With the tighter weave burlap, however, it is
easier to paint more intricate images on it.
When your paint is dry, you can stuff the burlap shape.
If your hanging is going outside, be sure to stuff your shape
with a material that will not mind getting a little moist.
One option that is free is plastic bags from stores.

To keep the edges of your shape from fraying as much
as possible, use a ruler or the end of a paint brush to
poke the bags into the openings that you left while you
were gluing (or sewing) the two shapes together.
If a whole bag is making a bigger lump than you want,
you can cut the bags in half (or more).
Trim off any frayed edges that bother you.
To hang most burlap painted shapes, you use wire.
This aluminum wire (available at Dollar Tree and in
the floral sections of craft stores) is easy to cut and
bend but it is also pretty sturdy.

Just poke it through the burlap, make
a curly-q, then (leaving enough length to go over your
wreath hanger) poke it again on the other side.

With this shape burlap hanging, after about a week (and lots
of rainy weather), the tree looked like this:
Maybe there was not enough space between the wire
insertion points to support the length of the tree?
The wires were pulled out and a grosgrain ribbon loop was
glued onto the center of the back of the tree up high.
So far, so good...hanging without buckling now.

Although I wanted to add one more thing to the tree,
I needed it "as was" to take pictures for another blog
post showing the other outside decorations for this year.
"Make Big Candy For Decorating"

It looked perfectly fine BUT if you want to add a finishing
touch to your painted burlap hanging, you can outline the
edges (or more if you want) with fabric paint.

Painted burlap door hangings seem to hold up fine in a
covered area outside. They would probably not hold up
in an outside area that gets rain, snow, etc. directly on them.

One of the main reasons that I wanted this burlap hanging
on my door this year is that I made wreaths for the six
windows that are on the front of the house and I thought
something other than a wreath would give some variety.


"Make a Christmas Mesh Wreath"


The painted burlap Christmas tree along with the other
decorations that were made new this year combined to
win this award!

If you want a painted burlap Christmas tree for next year
"pin" it on your boards...I'm really late in posting this tute!
I'm sharing this post at
Sunday Showcase @ Under the Table and Dreaming
Metamorphosis Monday @ Between Naps On The Porch
Inspire Me Tuesday @ A Stroll Thru Life
Nifty Thrifty Tuesday @ Coastal Charm


Wow, this is soooo cute! I love the tree and the garland is adorable! I can see why you won 1st place. Gayle, I hope you and your family have a Very Merry Christmas.
ReplyDeleteHugs,
Sherry
Adorable! The tutorial is wonderful, too. Congratulations on your award. :-)
ReplyDeleteChristmas blessings,
Kim @ Curtain Queen Creates
Of course you should be the hands down winner! I just love your candy and your tree tutorial is very detailed and informative~I have been wanting to try this for a while, maybe a Valentine coming up for my door! Thanks so much and Happy New Year!
ReplyDeleteJenna
This comment has been removed by the author.
ReplyDeleteI definitely enjoying every little bit of it. It is a great website and nice share. I want to thank you. Good job! You guys do a great blog, and have some great contents. Keep up the good work. tablecloth
ReplyDeleteThis allows a tree to quickly heal properly.Tree Cutting El Dorado Hills
ReplyDeleteThanks for the blog article. Really looking forward to read more. Really Great.Stump Removal Riverside
ReplyDeleteThanks for sharing; this is a fantastic blog post. Much thanks again.Stump Grinding Riverside
ReplyDeletePaying the fine or having something fixed or fixed would cost you hundreds, if not thousands, of dollars. It will be a lot less expensive if you could put in a couple of dollars just to have a tree administration done. Stump Grinding Huntington Beach
ReplyDeleteBeside this, they have long periods of involvement utilizing the gear to play out the work and save you from injury. Stump Removal near me Santa Ana, CA
ReplyDeleteSay you got a nice article post. Thanks Again. Really Cool.Nashville Tree Cutting professionals
ReplyDeleteWow, What a Excellent post. I really found this to much informatics. It is what i was searching for.I would like to suggest you that please keep sharing such type of info.Thanks Arbor Care Solutions
ReplyDeleteAppreciate you sharing great blog. Really looking forward to read more. Really Great.tree trimming
ReplyDeleteGetting a tree removed or trimmed may enhance the overall look of your landscape and prevent the labor and cost involved in cleaning the area again and again. tree removal
ReplyDeleteEnsure that the tree organization you employ has a Guaranteed Tree Care Wellbeing Proficient on staff, keeps industry security guidelines, security strategy, and the organization holds ordinary wellbeing gatherings.
ReplyDeletetree trimming