These summer projects have been secret (until now!)
because I have not had time the past three
because I have not had time the past three
months to even do one blog post.
I have done some fun and easy party and home decorating
projects that I hope to share better "how-to"s on
in the future but until then here's just a look at those.
in the future but until then here's just a look at those.
Growing Grass In Wooden Crates
One of the most inexpensive party centerpieces you can make
is real grass in a container. I have grown grass in closed
containers before (click here for a roundup of those) but
not a container with holes in it, like wooden crates.

Crates from a variety of craft stores were collected for the centerpieces
I helped a friend with a retirement party for her husband,
who is an avid golfer. It may be a stretch but I thought that
the grass would tie in with a golf theme for the party.
Wooden crates are inexpensive and readily available now
in craft stores. The thought was to make the crates look like
vintage shipping containers for golf balls using the last name
of the guest of honor.

a few different shades of white chalk paint.
Using the dry brush method and not covering each
layer completely eliminated the need for much sanding
for the crates to look have a sort of weathered look.
for the crates to look have a sort of weathered look.

composing the type on the computer and then running
vellum paper (from scrapbook paper section of craft stores)
through the computer. Then the vellum paper was cut to fit
and was attached to the painted crates with Mod-Podge.
and was attached to the painted crates with Mod-Podge.

had to be adapted. Wide burlap ribbon was attached to the
inside of the sides of the crates to hide the yucky-looking
cut-to-fit black construction grade trash bags that hold in dirt.
 Cut a single layer of the heavy duty plastic bags big enough to cover the bottom and sides of the crate.
The cut construction strength bags were held in place with thumbtacks. Sometimes they had to be hammered in.
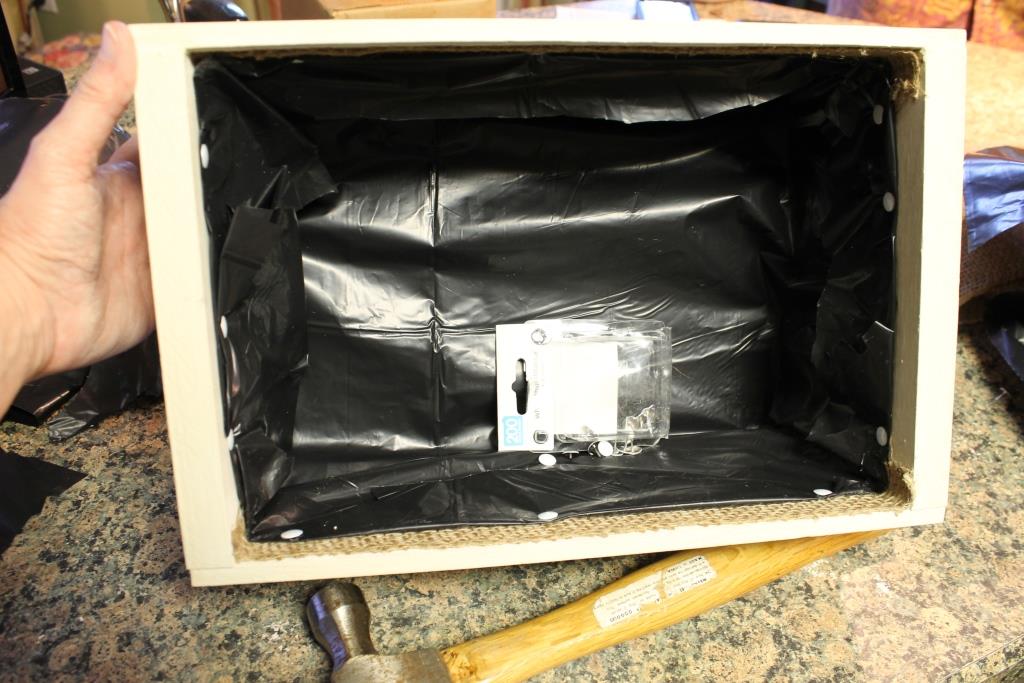
The cut construction strength bags were held in place with thumbtacks. Sometimes they had to be hammered in.


Tom Kat kept the grass watered each day while I was in
Colorado visiting my son and his family. We kept in daily
communication about the progress of the growing grass.
 It's always a knot-in-my-stomach kind of decision when to

plant the grass seed for a party centerpiece. The grass looked
its best at about ten days. It got a haircut. By party time, the
center of some of the grass centerpieces were wimpy
in the middle. No one but us probably noticed that.

The colors in the centerpieces (green grass, white crates,
black lettering) dictated the color theme of the party.
We used black and white chevron plastic table covering from
Hobby Lobby for the long tables. It looked thin on the roll
but was great once it was on the tables.


Green cups and napkins added the pop of color at the party.

A few days before the retirement party, the hostess called me
to tell me that instead of 150 people (that we had projected
would come and therefore gave us the number of grass
centerpieces, etc.) that 250 people had RSVP'd the party.
Yikes! More tables! More centerpieces!
Extra tables were going to be added to the adjacent rooms
of the main seating area...too late to grow more grass.
I asked the guest of honor for any extra golf balls he may have
to make more centerpieces with a golf theme. Making these
extra centerpieces actually spurred another project I continued
through the rest of the summer refining (not perfected yet).
Faux Glass Etching
For quickie and inexpensive table centerpieces, we used
clear glass vases and other things that I have in the attic.
Clear (sort of) full sheet mailing labels from Office Depot
and the home computer were utilized to make labels for vases
and the home computer were utilized to make labels for vases
to tie in with the retirement theme. To make the centerpiece
more substantial, we had three elements per table.


Ummm... as hard as I tried to get everything done by the
time of the party, guests starting arriving an hour early!
Horrifying for a last-minute person like me. They offered to
help put flowers in the vases...some did not turn out as I
had pictured in my mind....oh well!

I had made faux aged labels using coffee grounds on poster
paper. The clear labels were applied over the cut poster paper.)
OK...back to Faux Etched Glass...so I did not like that the edges
of the clear mailing labels were visible at the retirement party.
I wondered if a border was added and lightening the text
before it was printed on the computer, if it would look more
like it was actually etched on the glass.
like it was actually etched on the glass.
In August I got to go to a reunion of friends from college.

Since I am not good with keeping up with their birthdays,
I wanted to take a little gift along to give each one.
At Wal Mart I found Burt's Bees candles for only $5 each.

I made name labels on full-sheet clear shipping
label paper ahead of the trip, let each girl pick a scent,
label paper ahead of the trip, let each girl pick a scent,
and then added the name label to each girl's selected candle.
 1. Composed labels with PicMonkey "design" option,
made background transparent, utilized the overlay
feature for borders and the text feature for names
2. Printed the design on clear shipping label and cut out
the names close to the border
3. Took backing off of label and applied to opposite
side of candle from the original label

made background transparent, utilized the overlay
feature for borders and the text feature for names
2. Printed the design on clear shipping label and cut out
the names close to the border
3. Took backing off of label and applied to opposite
side of candle from the original label
4. Inexpensive personalized little gift
 At a baby shower I was co-hosting, I used the same clear

mailing label and computer technique to add personalization
to some vases. I used the sides of the Dollar Tree tall
square vases as the "border" for the faux glass etching.
square vases as the "border" for the faux glass etching.

"Caroline" text on the label on the smaller vase.
When Baby Caroline was actually born on August 28th
I took a replacement vase with a new and improved
faux etched glass vase to the hospital for her.

The shipping labels are about $1.50 each so I tried to get as many labels on the sheet as possible.
1. Compose labels on computer and print out on
"clear" full sheet shipping labels (from office supply).
2. Cut out name (close to edging as possible)
from printed shipping label.
3. Take backing off of trimmed shipping label
and press onto glass vase smoothing out any wrinkles
4. Place flowers in embellished vase. Label is
not water-proof...don't get water on it.

Caroline...Isn't she lovely...Isn't she beautiful!?
An advantage of these faux etched glass labels is that they
can be placed on vases, etc. for a party but then peeled
off so the vases can be used again for another occasions.
DIY Striped Table Runners
Another project that I did for Caroline's baby shower was
table runners to go over the restaurant's table cloths to try to
bring out more of our color scheme which was pink and green.
You can use this same technique to make runners in
the colors of your choice to go with your party's theme.
You can use this same technique to make runners in
the colors of your choice to go with your party's theme.
White burlap was used for these runners...it was very
inexpensive...$3 per yard...three yards were used to make
two runners so they were about $4.50 each before adding
cost for craft paint and masking tape (which was very little).

9 feet long and 22 inches wide before ironing and hemming.
2. Press masking (or painter's) tape along the edge of where
you want the stripes to be. Measuring is recommended.
3. Use acrylic or craft paint to paint the stripes between the
taped lines. Get most of the paint off of the brush before
painting so that it will not "bleed" under the tape.
4. Take the tape off to reveal your stripes.

At the actual baby shower we made a change in plans and
used both runners end-to-end on the pushed together tables.

so we would have all the same pattern underneath the runner.
Groups of three vases were placed along the runner.


Using both the runners on the eating table left the cupcake
table with only the restaurant's black tablecloth :( .

I was so happy that I had purchased the paper flower-looking
cupcake holders at Michael's. They made my fairly ordinary
cupcakes look extra special. I recommend them.
Summer Home Decorations
For the last three summers I have done lots of summer
decorating but this year I had to scale that back.
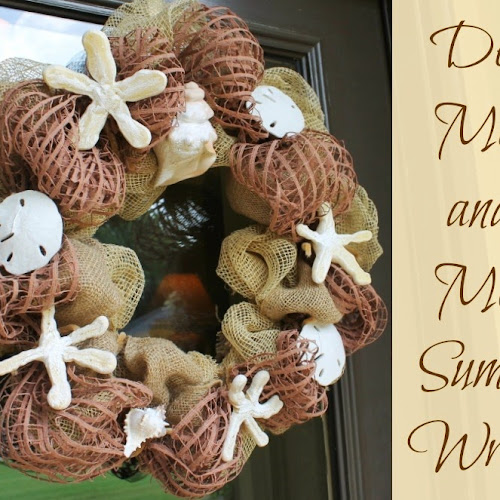
The dining room got some of my favorite summer items.

starfish and seahorses painted white and some real starfish too.

sit in apothecary jars on a base of collected seashells.

to paint a few summers ago holds DIY seafans, DIY coral,
seashells and all kinds of starfish.

scientific seashell print. The print was attached to foam core
with spray adhesive so it does not need glass over it (which
to me sometimes has annoying glare).
 The faux buoys were found on the clearance aisle in
Hobby Lobby and repainted with DIY chalk paint.
The amber fishing floats also came from Hobby Lobby.
The kitchen got minimal summer decorating too.
Mostly just summer sayings on DIY chalkboards.
 R.W.E. stands for Ralph Waldo Emerson...I ran out of room to write that long name.

I don't know who wrote this quote...sorry.
This upcycled frame has been the center of attention on the
kitchen table this summer surrounded by frogs and orchids.

These glorious orchids have been blooming like crazy for
over a month. They were only $10 each at the grocery store.


The leaves on this orchid plant are healthy looking.
While we are waiting for it to bloom again, I stuck a
stem of artificial orchid flowers in the dirt and tied it
onto the original stem to brighten this kitchen corner.

A Summer-into-Fall project is repainting one of our bedrooms.
We are empty nesters and that room rarely has anyone
sleeping in it although we do have a sleeper sofa in there.
 I'm planning on putting a gallery of pieces on the wall above the sofa...some of those pieces are pictured.
I'm tired of the gold/green/red combo and want to go with
the fresher color combo of red and turquoise. I had a hard
time deciding on the right color (not my strong suit).

Another project for that room will be stenciling fabric
to make curtains.

My husband is even letting me paint his wooden
bookcases in that room white!

Hopefully I will finish that room soon and not keep it a
secret for as long as I have my summer projects!
with spray adhesive so it does not need glass over it (which
to me sometimes has annoying glare).

Hobby Lobby and repainted with DIY chalk paint.
The amber fishing floats also came from Hobby Lobby.
The kitchen got minimal summer decorating too.
Mostly just summer sayings on DIY chalkboards.


I don't know who wrote this quote...sorry.
This upcycled frame has been the center of attention on the
kitchen table this summer surrounded by frogs and orchids.

These glorious orchids have been blooming like crazy for
over a month. They were only $10 each at the grocery store.


The leaves on this orchid plant are healthy looking.
While we are waiting for it to bloom again, I stuck a
stem of artificial orchid flowers in the dirt and tied it
onto the original stem to brighten this kitchen corner.

A Summer-into-Fall project is repainting one of our bedrooms.
We are empty nesters and that room rarely has anyone
sleeping in it although we do have a sleeper sofa in there.

I'm tired of the gold/green/red combo and want to go with
the fresher color combo of red and turquoise. I had a hard
time deciding on the right color (not my strong suit).

Another project for that room will be stenciling fabric
to make curtains.

My husband is even letting me paint his wooden
bookcases in that room white!

Hopefully I will finish that room soon and not keep it a
secret for as long as I have my summer projects!