At this time of year where I live, we see all types of birds
hatching and nurturing their little babies. It is so fun to watch
them grow. One mama cardinal made a nest outside our
window recently, laid her eggs and now is busy all day
feeding the little hatchlings.

Can you see the tufts of feathers on their heads? They look like little Muppets.
All the aviary activity around here made me want to get my
collection of nests and (not real) birds out of the attic again.
It has been four years since I made a vignette with them.
It was one of my first blog posts.
It is called Springtime Nesting .
Click on above highlighted link to take you to that blog post.
I've also added more bird-related items since that time
to my stash in the attic. As I was getting everything out
and placing it in the living room, I ended up making a few
more things to add to the bird/feather theme going on.
Here's one of the living room in it's feathered finery...

...and the console on the other side.

The console was a flea market find that my husband and I refinished.
Let's start the close-up tour there.


The birds (all greenish but not matched perfectly) are nesting
on top of repainted clearance-aisle Hobby Lobby candlesticks.
They are sitting in front of framed chicken wire that is
easy to change out seasonally.

Sometimes the framed chicken wire has lots of items on
it but I kept it pretty simple this time around with feather
garlands* and a Bible verse printed out on burlap*.
(Some folks like to see how things in the photos are made
and some don't. At the end of the post, I have more
details about how some of the items in the living room
were done...they will be marked with an asterisk*.
If you only want to see the living room and not the
details, you can click away before the end of the post.)


The focal point of the room is the mantle and bookcases.

The log slices in the fireplace box aren't real. To see how they are made click .DIY Wood Slices.
The mantle arrangement is centered around a print
that I made look like a painting with artist gel medium.

In keeping with the "painting's" green and white look, vases
and florals in the same tones were added to the mantle.

A trick that I like to use to make the artificial flowers seem
more real is to use real greenery. To keep the greenery fresh
for the longest time possible, you need to use wet floral foam.*


Did you notice the birds on the urn? I've had those urns
for years. They were a great but dark color.
I finally decided to paint them* for this mantle vignette.

I'm happy to see my green ceramic bird pair again.
I had almost forgotten about them.


The lounge chair got a feather-embellished pillow* and
the bookcases had bird-related items added also.


On the very top shelf is one of the tops to the urns on
the mantle. I did have some (not real) birds in the cages but they
looked sad all caged up so I opened the doors and let them free.

Next to the double bookcases is the sofa area.

A collection of $1 wooden birdhouses (some older, some new)
were painted with acrylic paints and placed on a wood and
wire tiered tray from World Market to sit on the coffee table.

The sofa has bird/feather themed pillows*.


On the linen-covered side table sits our tiny collection of
magnifying glasses and a trio of birds.

Thanks so much for taking time to tour my fine feathered
living room! Probably should'a/could'a/would'a been
earlier in the Spring but that is my life at this point.
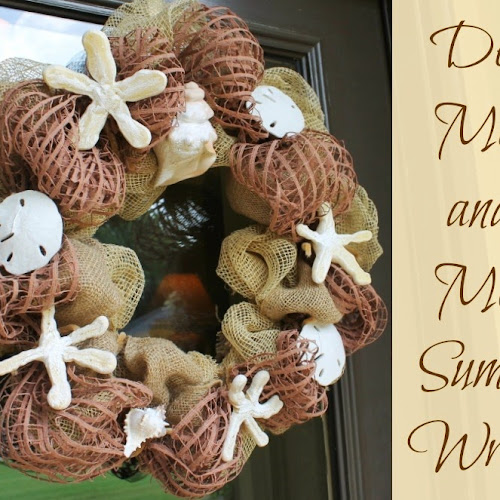
Honestly, I probably will let my Summer shells, sea fans,
starfish, etc. take a break this summer and I'll enjoy the birds.
Here are some behind the scene details if you care to see...
Actually all of the pillows in the room turned out to be
double-sided. I found out that if a turned a Christmas
pillow around, I could put strips of feathers on it, a
needlepoint pillow can display a feather garland on the
back and a newly made pillow can have two faces.
Having hoarder tendencies, I could not resist these packs
of feathers attached to bias tape that were marked down
to $1 each (who knows how many years ago).
Yeah! I finally get to use them. Don't tell that
the pillow says "Noel" in sequins on the other side.

The strips were easy to hand stitch onto the pillow in
a grid design.


The larger pillows on the sofa took more time.
A yard and a half of fabric that has been waiting for years to
be made into a pillow came out of the attic to be the base
for a bird-themed stencil design pillow.

Already had the 22" pillow form and used a scrap left
over from the linen cover on the side table to stencil.

Pictured also above is more of the feathers on bias strip but I decided not to use it on this pillow.
The stencil of birds was fairly small. By replicating it and
turning it over (after cleaning and drying it well), I was
able to design a pattern to make the linen center of the
pillow interesting.

The foam spouncers that I bought were a little hard to work
with on the small stencil. I ended up just using a small
regular paint brush for the stenciling.

To keep the original intent I had bought the botanical fabric
for, I decided on one of the plants to feature for one side
of the pillow. I went on and cut that out of the fabric.

Two more sides of the pillows were cut out to attach the
stenciled linen to. As long as they were big enough, the
design that the linen would be stitched to would not matter.

A small hem was ironed around the edge of the stenciled linen.
Then it was pinned in the center of one of the
"unimportant" panels of the pillow and sewn close to the edge.
Right sides of the pillow were pinned together and joined with
about 1/2" seam, leaving a fairly large opening in the
bottom of the pillow to insert the pillow form.

The bottom of the pillow was hand stitched closed after
the pillow form was inserted. I didn't worry too much about
making the stitches small since I may take the form out
sometime during the year and use it for another season.

Here is the bird side of the pillow...

...and the botanical side of the pillow to use another time.

The back of a needle pointed pillow became the base
for a garland of feathers.
The garland was made from twine and a feather boa
purchased back in 2004 (never used but has fallen apart).
These look like fancy chicken feathers to me.

If you don't happen to have a falling-apart feather boa, you can buy feathers at the craft stores.
Feathers were glued one by one onto the twine.
It was much quicker than I thought it was going to be.

The four skimpier feather garlands were used on the
chicken wire frame display. The thicker garland (feathers
glued closer together) was used on the pillow.

After the glue dried and the feathers were secure, the twine
holding the feathers was stitched onto the pillow back.

A few more feathers were added to cover the worst stitches.
Another piece of twine was tied into a bow on each end of
the twine to give it a finishing touch. A stitch was also
needed on the bow to keep it from drooping.

The feather garland could easily be cut off if needed.
The other four garlands were tied in a similar manner on
the chicken wire.

Feathers were also glued onto small clothespins to
attach the Bible verses to the chicken wire.
There are plenty on tutorials about how to print on burlap
from your home computer. I have not tried them. I did
see this pack of pre-prepared burlap pieces ready to
run through a computer at Walmart. The sheets were
only $1 each (3 in a pack) so I gave them a try.

I designed printables in PicMonkey to use.
The sheets were very easy to use and turned out great.

Here are the printables if you want to print either of
these Bibles verses on the paper of your choice.


If you need help in knowing how to download
and print these, click on this blog post...
Changing the color of the bird urns took longer than
I thought it would. I like these urns just like they are
from the store (maybe Kirklands? many moons ago).
The problem was that I tend to not use dark colors in
the Spring and Summer and I tend to not use birds
in the Fall and Winter so the urns were seldom used.

I think the other top is somewhere in the attic.
To paint the urns I used two colors of "Americana Chalky
Finish" paint available at crafts stores. The first coat was
"Everlasting" white.

The second coat was the tan color (didn't have a name on it).

To make all the the pretty details on the urns stand out more,
I also added some "diluted" dark wax when the painted dried.
To me, the dark wax on its own it too dark (especially on
light pieces) so I now use a ratio of about 1/4 dark wax
to 3/4 clear wax. It is still dark but it is easier to work with.
Just mash the two waxes together with a plastic fork.

To get the wax into all of the tiny crevices, I used an old
paint brush to put the wax on. Then I wiped it down with
a white soft rag to remove some of the wax.

Because I used real greenery with fake flowers, I needed to
put soaked floral foam for fresh flowers in the containers.

Because the urns were pretty deep, I put a saucer down inside
of them to hold up the foam and not have to use so much.
One brick of foam was cut up to use for five little vases
and another one was split for the urns. It is very easy to cut.

If you keep the foam wet, you will probably only need to
replace the real greenery once a week.
One place that I used floral foam for dried or silk flowers
is to help secure a twig for birds to perch on.

A piece of foam was cut to fit inside a pot holding up a
skinny chicken wire cage. Then a twig was inserted into
the foam. The birds were wired onto the twig
(they come with wires on their bottoms or feet)
and the cage was carefully wiggled down over them.
The birds on the twig are for some reason called
"mushroom birds". I googled to find out why they are called
that but I did not find a good explanation. The are usually
available in the floral section of craft stores.
Another place that I used mushroom birds was in a
row of nests on a bookcase shelf.

Some of the nests that I had were so flat and skimpy that
I stacked them up to make them look better. Some
feathers were also added to hide the stacking up trick.
Back at the end of Fall, World Market marked these nests
way down to clear them out. I started to pull the slightly
Fall-ish ferns off of them but then I decided not to.

They also got a skimpy nest added to their center to
elevate the birds I used in them a little more.

Wow! If you stayed till the end of this post, you are a
trooper! Have a wonderful Memorial Day!